 WARNING: This product can expose you to chemicals that are known to the State of California to cause cancer, birth defects or other reproductive harm. For more information, visit www.P65warnings.ca.gov.
Choose Between The Following SKU's Above: 95501A0-SB, 95501A0-S, 95501A0-TB, 95501A0-T, 95501A0-BB, 95501A0-B.
The stock center support bearing carrier holds the driveshaft in place with rubber so thin about 20 lbs of force moves it from center to the end of its travel. While that’s great for making sure no NVH makes it to the cabin, the stock bushing is extremely prone to failure, especially in harsher climates and on higher-powered cars. Even on the best-kept cars, the stock rubber bushing dry rots and cracks by the time it’s 10-15 years old. When the bushing lets go, it leads to excessive vibrations and clunking which can damage the transmission and rear diff. To make matters worse, the stock carrier is molded onto the center support bearing, leading to costly driveshaft replacement.
This upgraded unit keeps the driveshaft firmly in place at all times, and its polyurethane construction ensures it will never wear out. The thick bushings ensure the driveshaft cannot move from center, maintaining driveshaft alignment at all times.
Two options are available for the bushings, both of which are many times over better than the stock bushings. We’ve paid close attention to the NVH levels associated with this upgrade. After extensive design iterations, we’ve come up with custom isolator bushings that separate the carrier from the body of the vehicle and mounting hardware. These carriers substantially reduce NVH levels.
The street bushings absorb most of the NVH from the drivetrain. Some light NVH is possible at some speeds in the form of a soft hum. With a modified exhaust or windows down you’ll probably never hear it.
The track bushings are for those who want no-compromise drivetrain performance. These may create a substantial amount of cabin noise. Not sure which is for you? Try them both, they’re interchangeable!
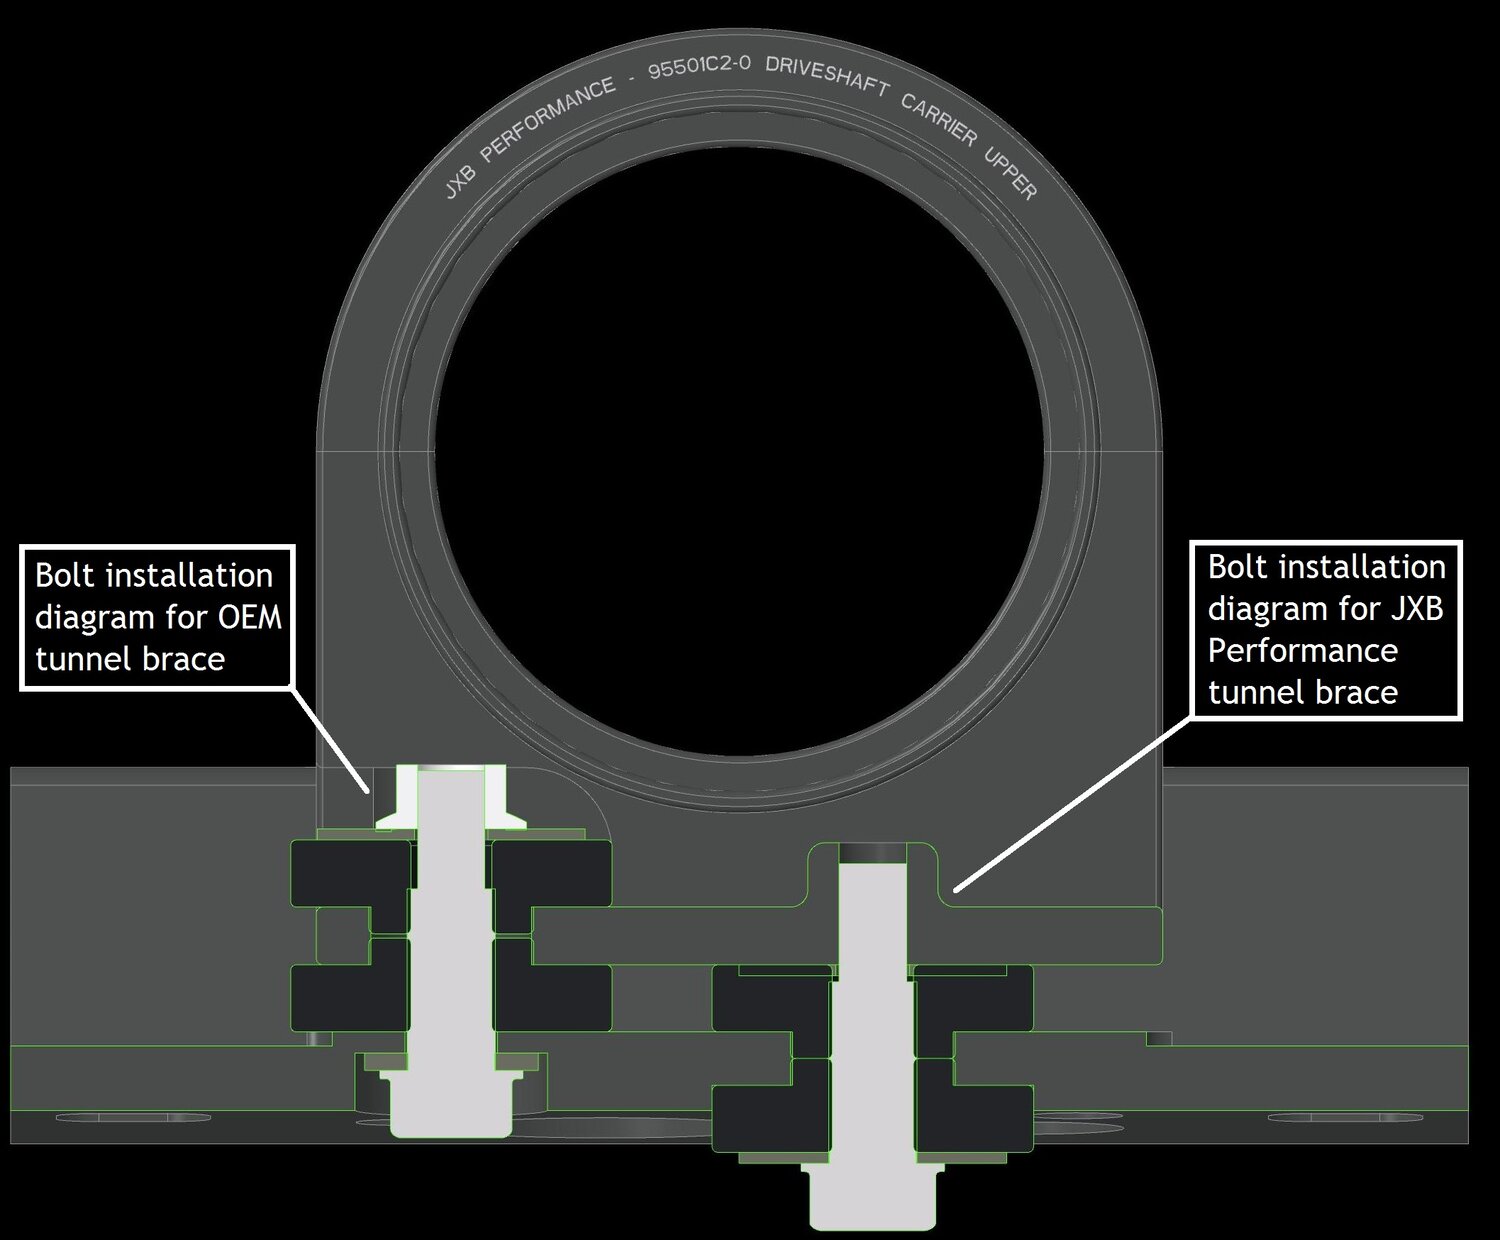
Installation doesn’t require disassembly of the driveshaft. The 2-part design clamps around the OEM bearing. The old carrier must be removed, so a cutting tool is required. There are 2 ways to bolt up the new carrier:
-
Option A
-
Illustrated using the left bolt below in the picture below, Option A is the only way to install the carrier using the OEM tunnel brace. You first clamp the carrier around the driveshaft, then a nut and bolt hold the carrier to the OEM brace. Access for the nut is tight, so the front of the driveshaft must be lowered to get a wrench on the nut. Once tight, the entire assembly is bolted up to the body. For a first-timer, installation will be about 1.5-2 hrs.
-
-
Option B
-
Illustrated using the right bolt below, Option B makes use of a custom tunnel brace to make installation faster and easier. The bottom half of the carrier can be bolted to the new tunnel brace while off the car, then special holes in the brace allow you to bolt the two halves together at the very end. This method doesn’t require lowering the front of the driveshaft. For a first-timer, installation will be about an hour.
-

- PDP tag:
- Free Shipping*


